Tuesday, June 4, 2019
Hi, friends. Another post! Two in one day! Woohoo!! I've added baseboards to cover the uneven edges of the flooring. Although, even if they'd been even, I think the baseboards make the room look finished. I've only done these two rooms. Today, I'll buy another package of them and do the other rooms. As always, thanks for visiting!!
Hi friends, finally the fireplace in the bedroom is finished. Isn't it cute?
The fire is a flickering tea light that I bought at Halloween time. I painted it red with gray and added twigs to the top.
This is the finished fire screen with paper hinges that I made. It actually bends.
The screen is from an actual screen door that my husband repaired last year. You can see the sewing pins in the hinges. In this picture, I've painted them black. After this, I painted just a bit of silver of them to make them appear old.
This was my inspiration for the fireplace screen. From a magazine.
Skinny strips of wood and small pieces of scrap book paper. The wood is 1/8 of an inch wide.
I cut the small strips of paper to fit the 1/8 inch wide wood.
Here, you can see that I wrapped the paper around the pin and pinched the end to form the rounded part to hold the pin. Then I glued them onto the other strips of paper, alternating them so they would fit together like a hinge.
Saturday, May 4, 2019
Hello friends! Here is the closet - completed! I still have a lot of work to finish the room. I am now trying to make a rug. I am experimenting with rubber stamps and paint on a dark cloth. I haven't been able to make a pattern that looks right to me yet tho. I will keep trying. I hope you like my little closet. I guess now I must learn to sew more clothes for my little dolls so I have things to hang it. As always, thank you for visiting. Oh, I made the closet out of a hard paper product called Chip Board. The little baskets are made with sauce cups from McDonalds. The little handles are made with jewelry spacers and jump rings.
Sunday, April 28, 2019
Wednesday, April 17, 2019
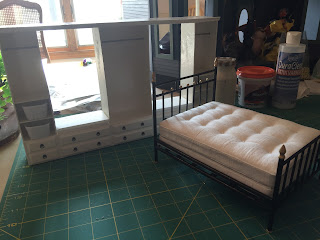
Hi, friends! Finally, another post, right? I wanted an iron bed for the mom's room in my little house so I looked on line and found a real one that I thought I could duplicate. I measured on graph paper first. I bought the small wooden dowels at Walmart. They came in bags, but a lot of them weren't straight so I had to buy a couple of long ones and cut them to size. Then I used a generic Dremel tool with a little rounded end drill bit to drill the holes in the dowels. The dowels that fit into those holes got sanded on each side so that they'd fit into the rounded holes. I used beads to decorate the bed. I filled the holes in the beads with gesso so they wouldn't look so much like beads, hehe. I used Kris's tutorial at 1inchminisbyKris, for the mattresses, only I didn't make the buttons like she did in the tufting. I glued in tiny beads.
Behind the bed is the closet for the bedroom that is almost complete. See the little plastic containers that I'll used for baskets? Those are sauce containers from McDonalds that I've trimmed. The handles on the faux drawers are bead spacers, and jewelry jump rings that I opened up to fit. I will next make bedding for the bed, and curtains for the windows, and finish the room with decor. I'll show you a pic when it's complete. I hope you like my little bed. Thank you for visiting.
Subscribe to:
Comments (Atom)


